Containerizing Alveo Accelerated Applications with Docker
Overview
What makes Docker so useful is how easy it can pull ready-to-use images from a central location. These images can also include Alveo accelerated applications to decouple the execution environment within the container from the host. The Docker image becomes a shareable object that can be reused and redistributed with the peace of mind that the container insulation from the host adds robustness to the overall solution. Still, care must be taken to ensure that both the image and the drivers installed on the host itself are compatible.
Running Hardware Accelerated FFmpeg Plugins with Docker and Alveo
In this article we focus on the setup of an Alveo card for a Docker image and assume you already have Docker installed and have access to an Alveo card. The most critical piece is then to make sure the host running the container has a version of the driver compatible with the application accelerator binary, the xclbin file. Indeed, an xclbin file compiled with Vitis expects a matching version of the Xilinx runtime (XRT) so that it can execute successfully. This runtime is installed as part of the Docker image while the driver of the corresponding version must be installed on the host to deploy the application.
Docker Image Example
To illustrate the creation of a Docker image for Alveo accelerated applications, we will use the example of a FFmpeg plugin to decompress on hardware an encoded H.264 bitstream. This Alveo plugin architecture is described on the Xilinx github site: https://github.com/Xilinx/FFmpeg-xma.
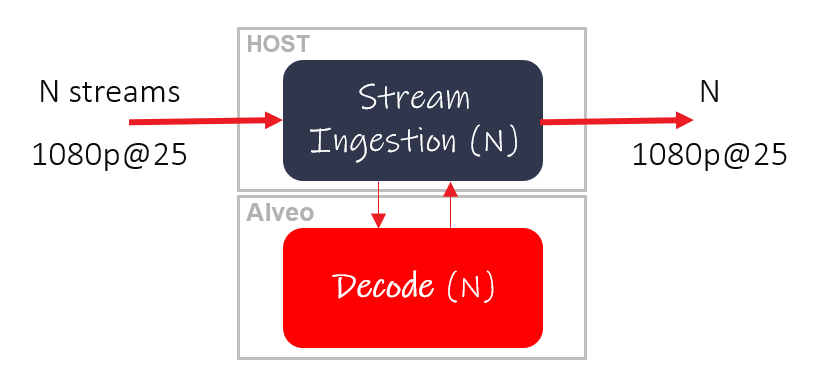
The plugin implements several video decoders onto the Alveo card, each decoder can then process multiple channels, up to 4.

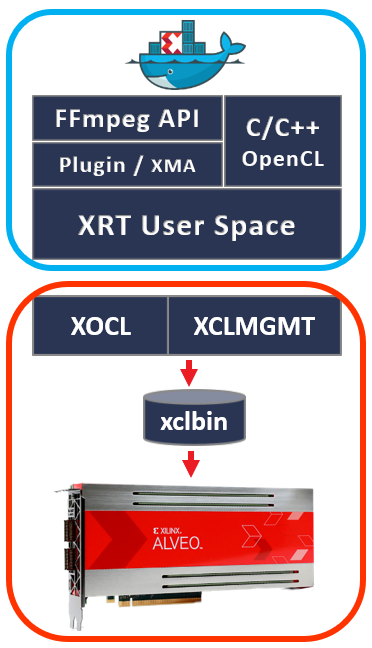
The FFmpeg API interacts with XMA (Xilinx Media Accelerator) and XRT (Xilinx runtime). At a lower level, the XOCL and XCLMGMT, respectively the user and management physical drivers, access the card via the PCIe link (see fig. 2 below). More information about these drivers, XMA and XRT can be found here: https://xilinx.github.io/XRT/2019.2/html/index.html.

Let’s now create a Docker image to run example from within a container:
Step 1: Setup the Dockerfile and assemble all the necessary packages and sources
Our Dockerfile starts with a standard Ubuntu release pulled from the registry.
We then copy onto the image a directory with all the relevant Debian packages that will enable our application. Right after we copy the validation scripts and finally, we copy the xclbin onto the image.
    FROM ubuntu:16.04

COPY ./ubuntu_pkgs/ /pkgs

RUN apt-get update && \
    apt-get install -y libxv1 && \
    apt-get install -y ffmpeg && \
    apt-get install -y /pkgs/xrt_201910.2.2.2173_16.04-xrt.deb && \
    apt-get install -y /pkgs/vyuh264-0.0.1-Linux.deb && \
    apt-get install -y /pkgs/xffmpeg-3.4.1-Linux.deb && \
    apt-get clean

COPY ./scripts ./scripts

COPY ./h264_xclbin /xclbin

COPY ./sdaccel.ini /opt/xilinx/ffmpeg/bin
Note that the ffmpeg and libxv1 packages are required dependencies of the xffmpeg package and need to be added onto the image. The XRT package is obtained from the Alveo product pages, for example for the Alveo U200, all the necessary packages including runtime are located here: /content/xilinx/en/products/boards-and-kits/alveo/u200.html#gettingStarted.
The Docker image only needs the XRT package.
Step 2: Creating the image
Based on the Dockerfile, we launch the command to create and tag (via the -t switch) the image:
docker image build -t imagetest:1.0 .
After a few minutes, the image will be created.
Step 3: Find your Alveo devices
We can now run the image interactively to verify that the application can access the PCIe link through the host drivers, we use the Docker –device option to access PCIe from the container.
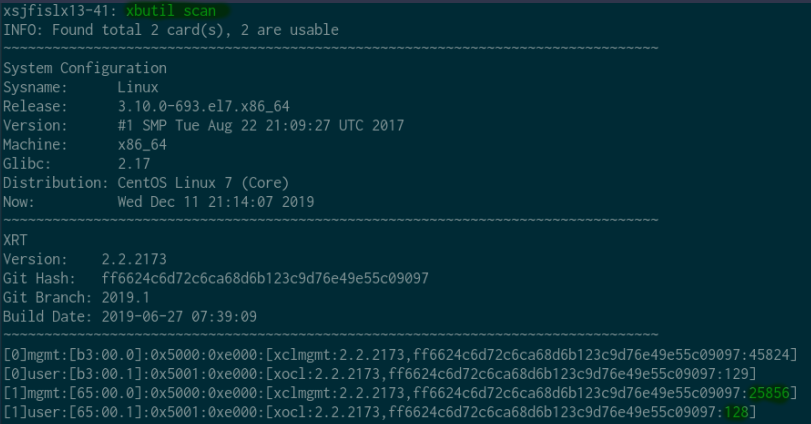
Our test system has two Alveo cards and we’ll need to access port information to determine the card user and management ports. This information can be extracted by typing “xbutil scan” (see below in fig. 4):

In our case we choose to target the card with the identification code [1], we determine its parameters listed at the bottom of the report in figure 4 and use them via to the –device option of “docker run” to enable PCIe access.
Step 4: Run the image interactively on host with pre-installed drivers
Running the command below gets us shell access into the container:
docker run -it --rm --name test1 --device=/dev/xclmgmt25856:/dev/xclmgmt25856 --device=/dev/dri/renderD128:/dev/dri/renderD128 imagetest:1.0
We can now test the Alveo cards from within the container, the “xbutil list” command confirms that we successfully mapped the card of interest:

We are now ready to launch the application to decode the compressed bitstream from the interactive session into the container:
ffmpeg -y -c:v VYUH264 -i BigBuckBunny_320x180.mp4 -vsync 0 output.yuv
Upon successful execution, the encoded bitstream is decoded through the Alveo accelerator and saved in the output.yuv file.
The advantage of using the –device option when launching the container is that we can access the card without elevated privileges but it’s also possible to run the image by simply mounting volumes (-v) and using the privileged mode (--privileged), like so:
docker run -it --rm --name test1 -v /dev:/dev -v /sys/bus/pci/devices/:/sys/bus/pci/devices -v /opt/xilinx/dsa:/opt/xilinx/dsa --privileged imagetest:1.0
Conclusion
Alveo accelerated applications can be delivered as Docker images as we illustrated with this FFmpeg accelerator example for video decompression.
Using Docker to run accelerated applications presents several advantages over direct execution on a host server, it allows for a self-contained, pre-validated setup within a shareable image that is easily distributable through Docker Hub.

About Frédéric Rivoallon
Frédéric Rivoallon is a member of the software marketing team in San Jose, CA and is the product manager for AMD HLS, besides high-level synthesis Frédéric also has expertise in compute acceleration with AMD devices, RTL synthesis, and timing closure. Past experiences taught him video compression and board design.