Debugging Your Applications on an Alveo Data Center Accelerator Card Using ChipScope
Introduction
The Xilinx® Vitis™ unified software platform provides application-level debug features and techniques on both emulation and hardware execution flows. This article focuses on debugging the designs on an Alveo™ Data Center accelerator card. Sometimes the design can pass hardware emulation but still have some problems when running on a real hardware platform. In this situation, we can adopt the Xilinx ChipScope tool to perform on-board debugging.
If you have experience with FPGA hardware development, you might know ChipScope well because it is a very common way to perform debugging on an FPGA. You can use it with the Vitis flow, but you must have a little bit of knowledge about the ChipScope tool. You can find more information about it in the Vivado Design Suite User Guide: Programming and Debugging (UG908).
In the Vitis flow, there are two ways to insert ChipScope cores to debug your kernels:
- Debug Applications Using Automatically Inserted System ILA Cores on Kernel Interfaces
- Debug Applications with Manually Added Chipscope ILA Cores (For RTL Kernels Only)
These two scenarios are demonstrated in the following sections.
Note: The following sections provide instructions on how to debug an acceleration project on an Alveo card, but they do not cover every detail on basic operations of the Vitis or Vivado tools. For information about performing operations in Vitis or Vivado, refer to other documentation on the Xilinx website.
Debug Applications Using Automatically Inserted System ILA Cores on Kernel Interfaces
Setting Up Your Environment
To set up your environment, do the following:
- Open the Vitis IDE and select a platform that you own and you want to test the application with.
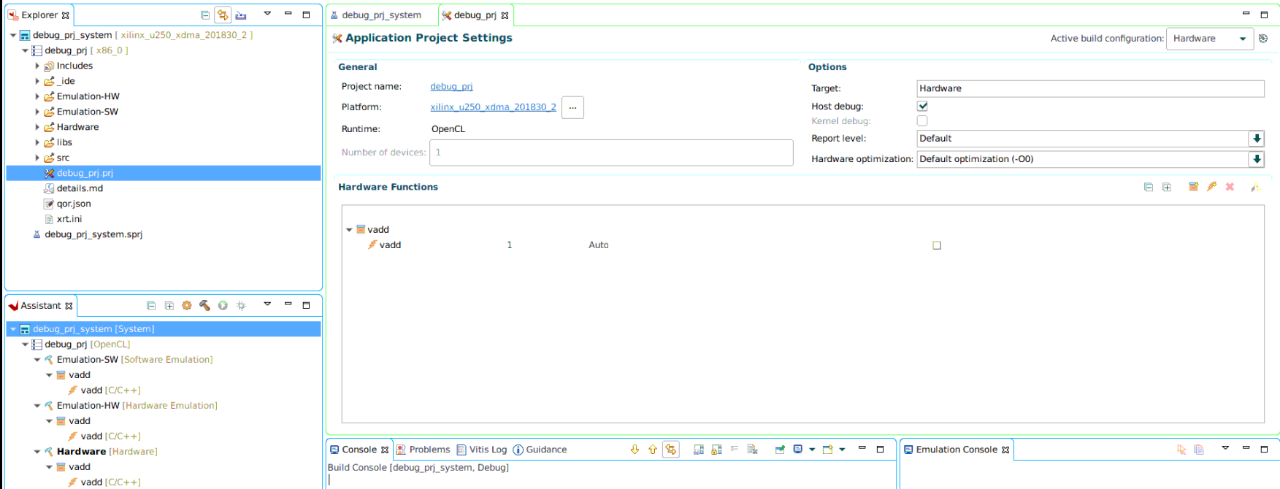
- Create a new application project and select the “loop reorder” template from the Vitis Acceleration Examples. In this case, this template is used as an example; you could select any other applicable applications
- Select hw as the active build and enable host debug. In this case, the host debug option is required to be enabled so that GDB debugging operations can be performed in Connect to the hardware server.
The project should be similar to the following.
Building the Target
To build the target:
- Set up the kernel to enable ChipScope cores insertion.
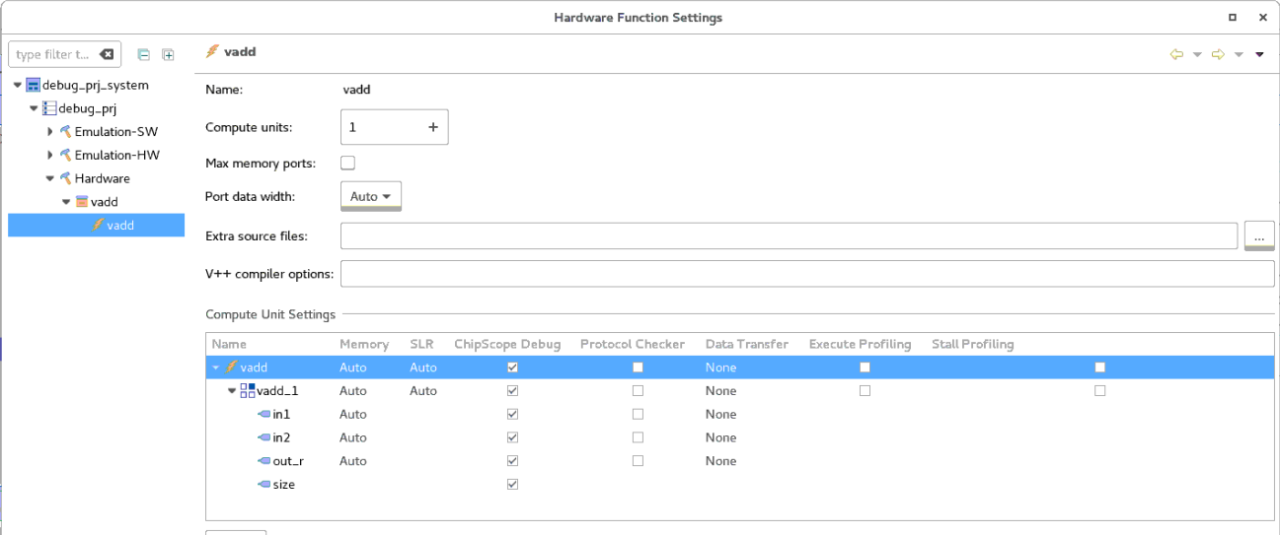
2. Build the hw target. This will take some time to complete.
3. Open the host code and set up breakpoints.
In this example, the breakpoint is set before launching kernel (line 131), but you could select any other location instead.
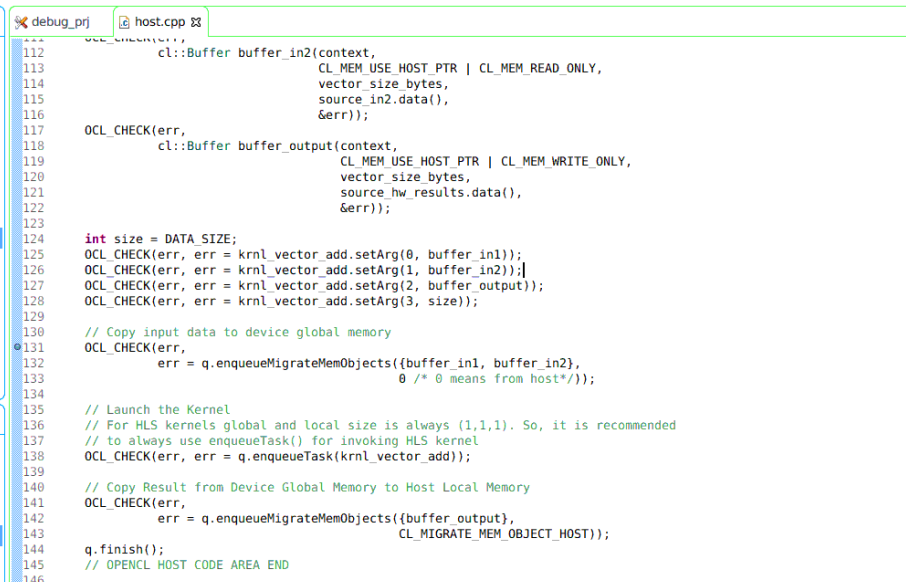
4. Click the Debug toolbar button to launch your application in the Debug perspective.
The application pauses at the main function entry.
5. Click the Resume button to resume the application.
It pauses at the breakpoint you added in the previous step.

Here you can perform standard GDB debugging operations to debug your host application. For this example, we will focus on how to debug kernels on the board using ChipScope, so we just use this breakpoint to pause the host application at a place before kernel execution in order to set up the ChipScope environment.
You can also use other ways to pause the host application, such as adding a piece of code snippet. To look for an example, refer to Adding ILA Triggers Before Starting Kernels in the Vitis documentation.
Connecting to the Hardware Server
The common scenario for an Alveo card setup is to be installed in the PCIe slot of a host machine, and all users connect to the host through Ethernet. In this scenario, the Xilinx Virtual Cable (XVC) technique is adopted for programming and debugging the Alveo card. XVC allows Vivado to communicate JTAG commands through Ethernet to program and debug FPGAs. An XVC server must be set up on a local host, which connects to the FPGA card. Vivado hardware manager sessions can be launched on other machines to connect remotely to that server.
- Open up a new terminal to set up the XVC server by entering following command:
debug_hw --xvc_pcie /dev/xvc_pub.<driver_id> --hw_server
If this command is executed successfully, you should see messages displayed in the terminal window similar to the following image.

- Open Vivado in a third terminal and connect to the XVC server using following command:
debug_hw --vivado --host <host name> --ltx_file <filename.ltx>
Note: If the Vivado hardware manager is launched on the same machine with the XVC server, use localhost as the host name. The filename.ltx is the file for debug probe information and it is normally located at the same folder as the xclbin file.
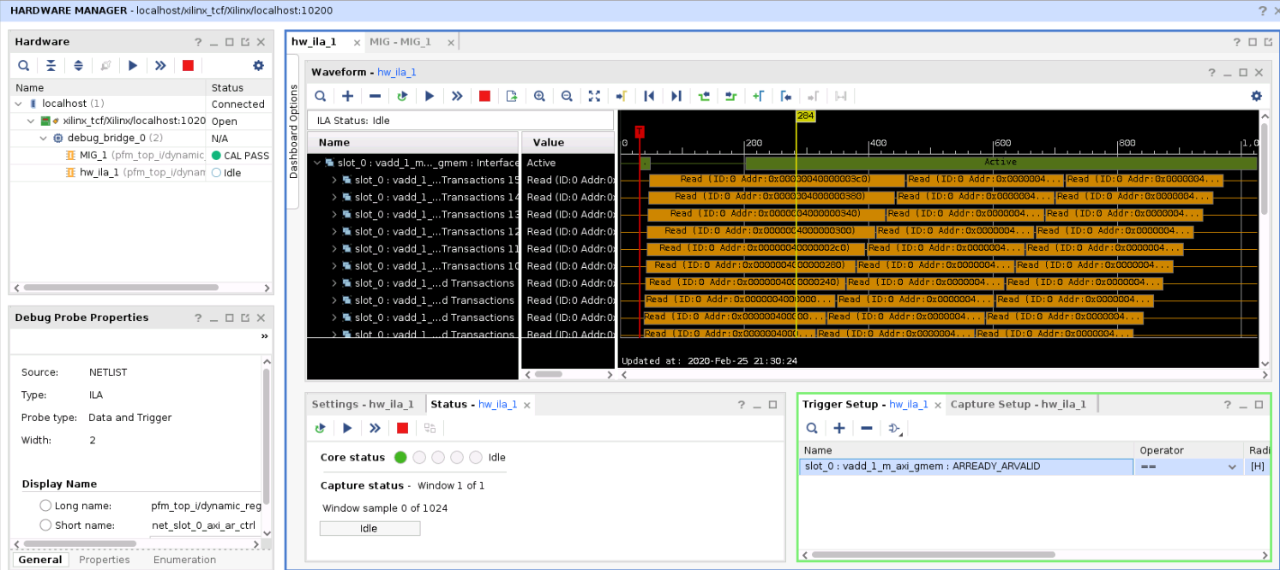
If everything was set up correctly, you should see two ILAs visible in the Vivado GUI. One is the pre-built MIG_1 core, and the other one named hw_ila_1 is the system ILA core that is inserted by the Vitis tool.

Debugging Your Application
Now you must set up the ILA trigger conditions.
- For this example, use the ARVALID signal of an AXI master interface as the trigger signal and capture the data when ARVALID is 1. You can define additional proper trigger conditions based on the data scenario that need to be captured.
- When you finish setting up the trigger conditions, click Run. The ILA changes to ‘waiting for trigger’ status.
- Go back to your Vitis project and click Resume to continue running the host application. If there are no other breakpoints set, the host application should run to the end and print out ‘Test Passed’ information.
- Switch back to the Vivado Hardware Manager dialog box. The ILA should be in triggered status and the signal waveforms are dumped and displayed if everything works fine.
Debugging Applications with Manually Added ChipScope ILA Cores (For RTL Kernels Only)
For RTL kernel designs, ChipScope cores such as ILA and VIO can be instantiated in the RTL code just like in traditional FPGA design. In this way, internal signals can be probed to provide more visibility inside the kernel. Hardware design knowledge is required to perform this skill. Also, it is very important to select appropriate signals for probing for better efficiency; however, this is out of the scope of this tutorial.
Setting Up Your Environment
To set up your environment, do the following:
- Create a new Vitis application project and select the Empty template.
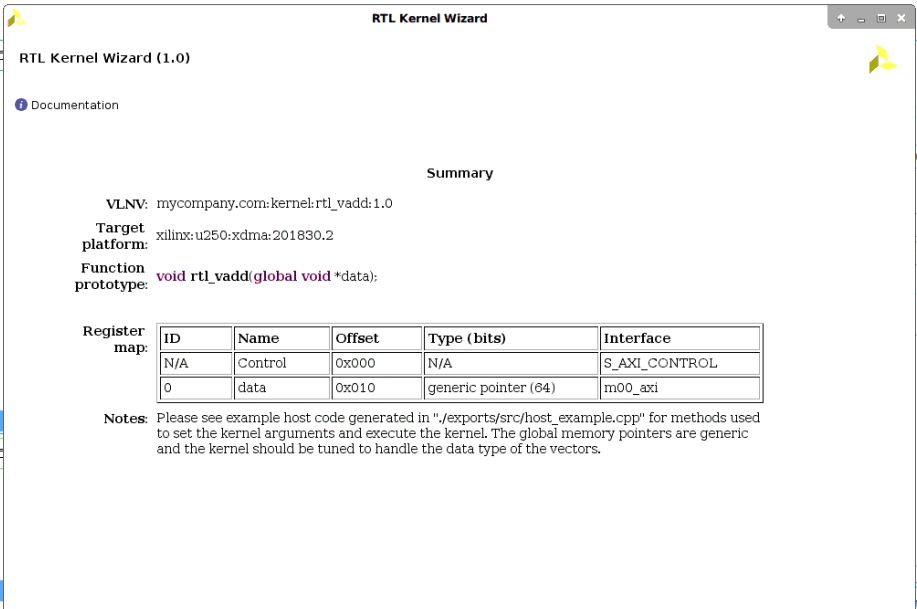
We are going to create a simple RTL kernel using RTL kernel wizard. For simplicity, only one AXI master memory port is selected for this demo. The summary page should be similar to the following image:
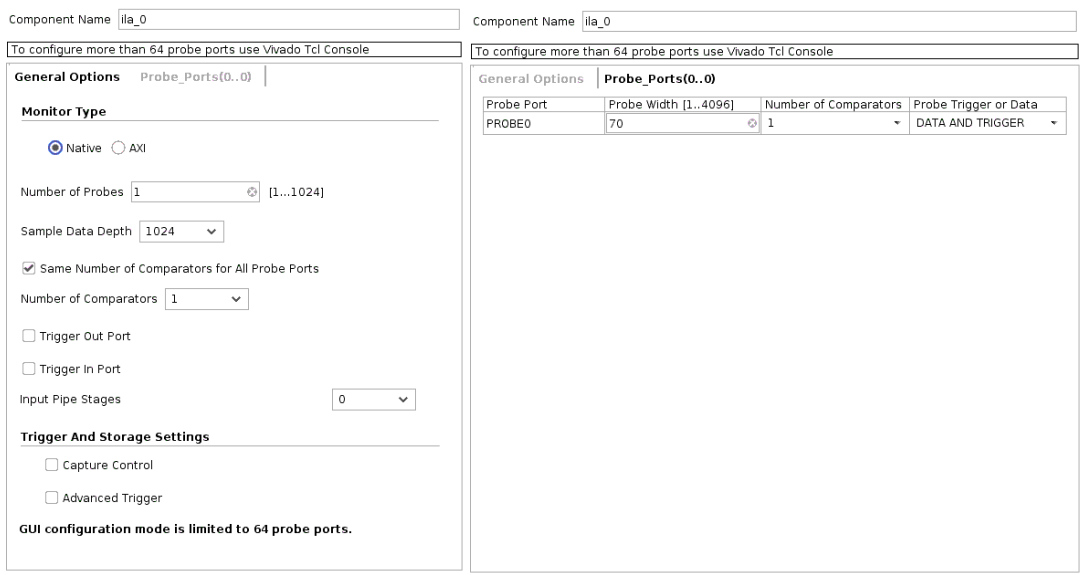
2. Create an ILA core in the IP catalog with the ILA configuration as shown in the following figure:
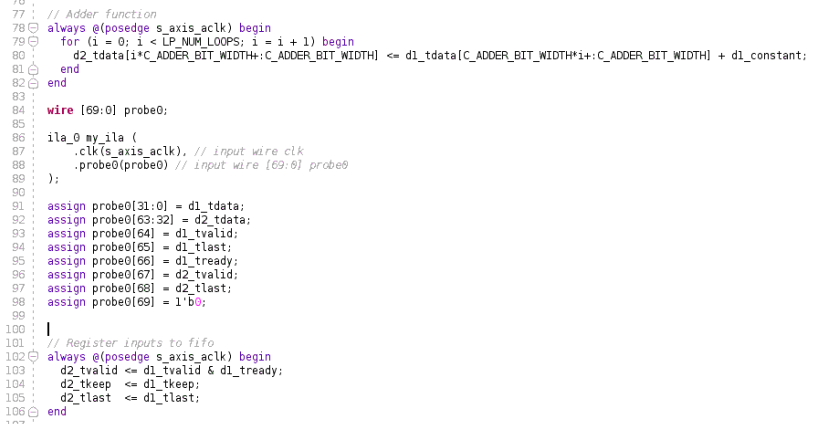
3. In the created RTL kernel example project, modify the rtl_vadd_example_adder.v file to insert the ILA core you just created.
4. Instantiate the ILA core in the design and make connections to the probe signals.
The modified code is as following:
5. Click the Generate RTL Kernel button in the left panel and close the Vivado project.
Building the Target
- Build the hw target in the Vitis application project.
Note: This might take some time to finish.
The RTL kernel wizard provides an example host code in the src folder.
2. Open the host code and add breakpoints.
For example, we can add one breakpoint at line 279 just before launching the kernel.

Connecting to the Hardware Server and Setting up the Trigger
- Set up the XVC server and open the Vivado hardware manager.
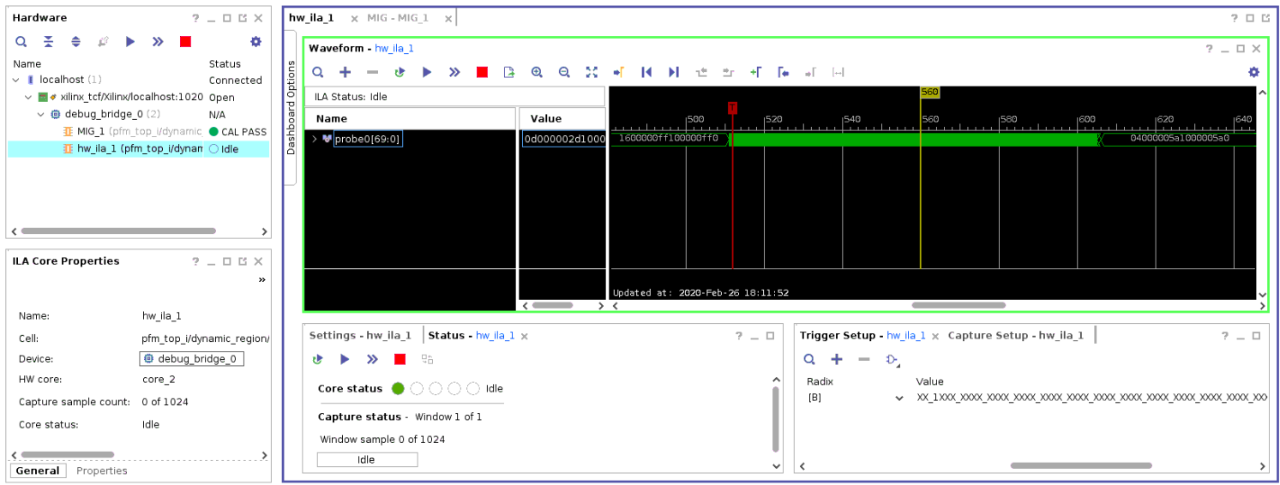
- Set probe0[67] as the trigger condition and use it to capture the d1_tdata and d2_tdata signals, as described in Debugging Your Application.
The ILA should be in triggered status and the signal waveforms are dumped and displayed.
Tips
- When setting up breakpoints in host code, it is better to set one after the xclbin loading command. After xclbin is loaded into FPGA, launch the Vivado hardware manager to get the updated debug core information.
- If you modify the ChipScope ILA information and the change is not reflected in Vivado, try closing the Vivado hardware manager and re-launch it to connect to the target one more time. Meanwhile, the .ltx file needs to match the ILA probe within the design; otherwise the debug information might not be correct.
Summary
Although you can rely on hardware emulation on to solve most of the functional problems, debugging on board is an essential and powerful capability for Vitis designs. Vitis leverages the ChipScope tool to provide a way to probe the kernels.
System ILAs can be inserted using dk options in Vitis commands to probe the kernel interfaces. This is an easy and automatic method and does not require any hardware knowledge. It is supported for all types of kernels.
For RTL kernels, you can also insert ChipScope cores inside your kernel following the traditional RTL design debug methods. This requires a little bit RTL knowledge and hardware design experience.

About Joyce Li
Joyce Li is a Technical Marketing Engineer working in AMD AI and Software team and has more than 15 years of experience in ACAP/FPGA design and applications. Since joining AMD in 2004, she has held different roles in technical sales, application engineering and technical marketing. During these years, she has worked extensively on Vivado, SDx and Vitis areas. She holds an doctor degree on E.E. from Beijing Institute of Technology.